Installing Word Press on AWS EC2
I’ve been wanting to setup a blog for a while now. A while now being almost a week! That led me to the obvious questions – should I build it from scratch, should I use a pre-configured platform, should I host my own blog, or should I just use a managed blogging service?
After looking around for a while, I decided to use WordPress.org. I could have taken an even shorter route by using WordPress.com instead but felt I would lose some of the flexibility, and would be stuck with a myblogname.wordpress.com URL.
Having settled on using WordPress.org, I then needed a hosting platform. Based on ease of use, cost effectiveness, and performance capabilities, my final choices were going with either Google Compute Engine or Amazon Web Services (AWS). I already use both extensively, and could have gone either way. However, I had some AWS credit set to expire in 2015 so decided to put it to good use.
Below is a step by step write up of how to proceed:
1) Get yourself an Amazon Web Services account by visiting aws.amazon.com. Your regular amazon.com shopping account will work.
2) Setup your EC2 instance
- Click on the cube you see in the upper left hand corner
- Select EC2 from the AWS console
- Click on Launch Instance
- After this you have to select what image makes the most sense for you. I selected Amazon Linux AMI followed by t2.micro as it is Free Tier eligible and suitable for a low traffic blog.
- Click through the wizard to setup your server; using the default values would work for most users.
- When you reach the ‘Configure Security Group’ step then add the following rules
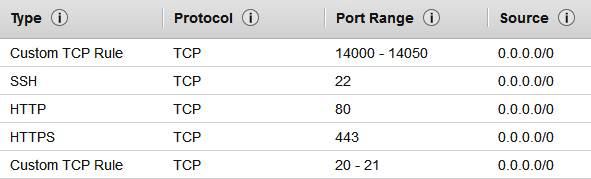
- Then click on ‘Review and Launch’
- Download the security key and save it”
3) Connect to your instance
- From the AWS console (which you can reach at any point by clicking on the cube in the upper left hand corner) select Instances
- You can use the browser based SSH client to connect
- I personally prefer using a standalone ssh client like Putty
- If you plan on using PUTTY you’ll have to convert the *.pem security key you downloaded in step 2 into a *.ppk format. You can do so using the PUTTYGEN tool which comes packaged with the PUTTY download
4) Follow the steps from the AWS tutorial site to configure your LAMP server
5) Follow the steps from the AWS tutorial site to configure Word Press on your server
6) To update themes, install plugins, and add media to your WP site you’ll need to configure FTP.
From the command line, run the following commands to install FTP
sudo yum install vsftpd
From the command line edit /etc/vsftpd/vsftpd.conf and add the below lines
anonymous_enable=NO
pasv_enable=YES
pasv_min_port=14000
pasv_max_port=14050
port_enable=YES
pasv_address=xxx.xxx.xxx.xxx (insert your EC2 instance’s public IP address)
pasv_addr_resolve=NO
Start the FTP service by typing in
sudo service vsftpd start
Configure your FTP service to automatically start on reboot
sudo chkconfig vsftpd on
7) Add and configure a new user for FTP Create a ftpuser and set a password
useradd ftpuser -d /var/www/html -s /sbin/nologin
sudo passwd ftpuser
Edit the /var/www/html/wp-config.php file and add the below:
/** FTP Settings */
define(‘FTP_HOST’, ‘Public IP address of your EC2 instance’);
define(‘FTP_USER’, ‘ftpuser’);
define(‘FTP_PASS’, ‘FTP_USER_PASSWORD’);
Set the file permissions as below
find /var/www/html/ -type d -exec chmod 755 {} +
find /var/www/html/ -type f -exec chmod 644 {} +
chown -R ftpuser /var/www/html
Restart the FTP service
sudo service vsftpd restart
After completing the above steps you should have WordPress running on your AWS server with the ability to update themes, install plugins, and add media.
You can further customize your blog with a custom domain name. Access the WordPress settings page and update the URL fields with your custom domain address.
From start to finish, including the time it took to search for the AWS tutorials, create user accounts, it took me less than 60 minutes to get the site up and running!
Tags: AWS